
A detailed, step-by-step illustration of pumpkin drawing techniques featuring various stages of pumpkin sketching, shading, and colour application, showcasing different realistic, cartoonish, and abstract styles, emphasising texture and form, all set against a simple background.
Fall is perfect for pumpkin drawing. Artists love capturing autumn’s beauty in their artwork.
This guide will help you draw pumpkins. You’ll learn techniques for great seasonal pictures.
Pumpkin drawing needs practice. It’s all about shape, shading, and texture.
We’ll break down complex steps. Anyone can learn to make excellent autumn art.
You’ll learn to sketch real pumpkins. We’ll explore creative designs and avoid common mistakes.
We aim to boost your skills. You’ll make beautiful fall art that shows your style.
Understanding Pumpkin Drawing Basics
Pumpkin drawing starts with core artistic skills. These skills form the base for great artwork.
Pumpkins have round or oblong shapes with vertical ridges. Artists should focus on these key features.
Start by sketching a basic circle or oval. Then, add curved lines for natural contours.
Light and shadow create depth in pumpkin drawings. Watch how light falls on the pumpkin’s surface.
Use soft pencil strokes for the pumpkin’s smooth texture. Practice will help you capture its bumpy exterior.
Begin with simple sketches of basic shapes. Then, slowly add more details to your drawing.
Try different tools, such as graphite, charcoal, or coloured pencils, to find what works best for your pumpkin art.
Techniques for Drawing Pumpkins
Drawing pumpkins needs unique methods to make your art come alive. Shading helps create depth in your picture.
Making texture is key for realistic pumpkins. Use different pencil strokes for the bumpy surface.
Light lines can show small changes in the skin. Try pressing harder or softer with your pencil.
Getting the 3D look right is essential for pumpkins. Start by drawing an oval or circle shape.
Notice how light falls on the pumpkin. This creates shadows that show its roundness.
Artists suggest using many shading methods. Crosshatching and stippling can add fine details.
Begin with light layers. Slowly make darker areas for depth and texture.
Keep practising to get better. Each pumpkin is unique, so try new ways to draw them.
Step-by-Step Pumpkin Drawing Guide
A detailed step-by-step process of sketching a pumpkin, showcasing various stages from initial rough outlines to refined details, including shading and texture, on a blank canvas, with art supplies scattered around like pencils, erasers, and sketch paper, capturing an artistic workspace atmosphere.
Let’s start with basic shapes. Draw a circle or oval for the pumpkin’s body.
This step captures the pumpkin’s natural rounded form. It’s key to your drawing.
Add curved vertical lines for the pumpkin’s ridges. Vary line thickness for depth.
Sketch a small, irregular shape for the stem. Use loose lines for a natural look.
Shading brings your pumpkin to life. Use soft pencil strokes between ridges.
Start light and build up darker areas. This adds volume and texture.
Pay attention to light sources. It creates a 3D effect in your drawing.
Clean up extra lines. Add final details to make your pumpkin unique.
Keep practising to master pumpkin sketching. Your skills will improve over time.
Creative Ideas for Pumpkin Drawings
Pumpkin designs offer endless artistic possibilities. Halloween fans can turn simple pumpkins into amazing seasonal masterpieces.
Try new styles and views to make your art stand out. Think outside the box with your pumpkin drawings.
Create fun scenes where pumpkins are the main characters. Add magic touches like odd patterns or surprising colours.
Mix watercolours and ink for dreamy effects in your art. Use digital tools to blend fundamental and fantasy elements.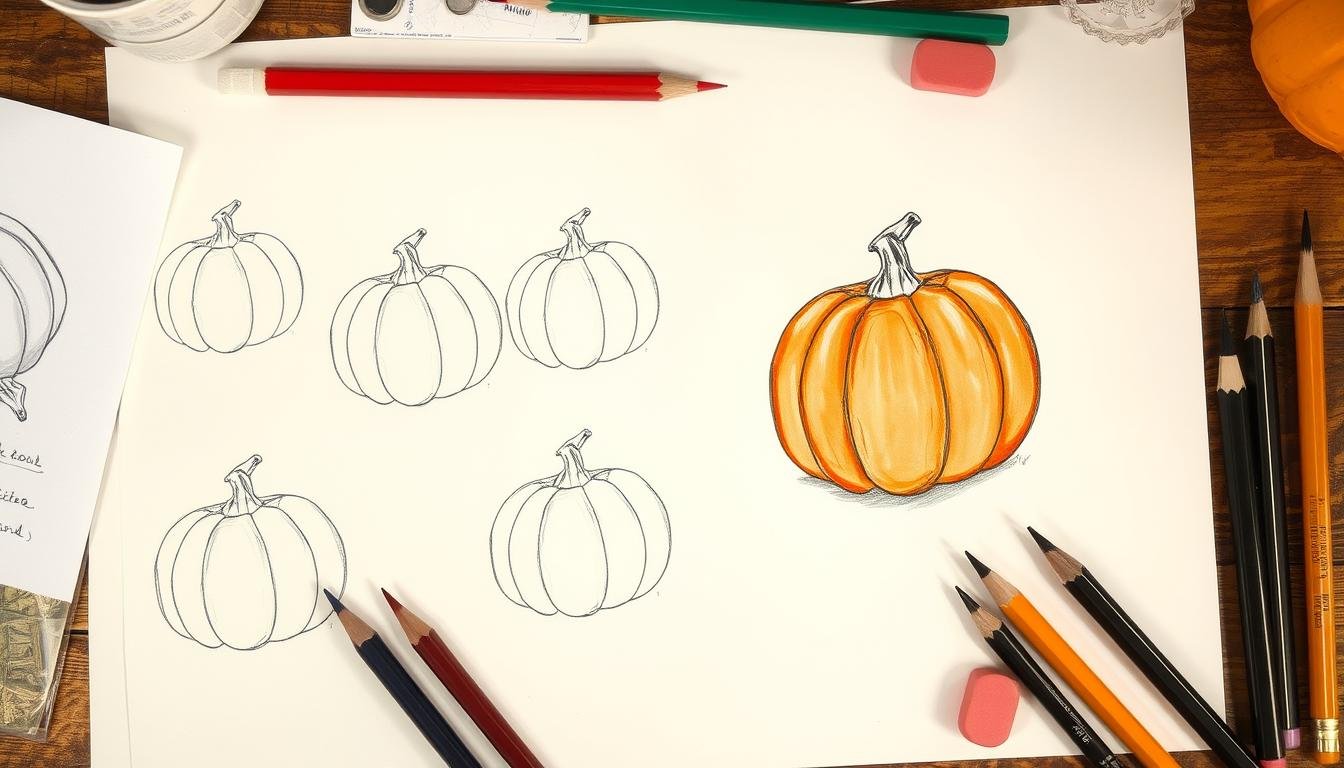
Try shadows, abstract art, or detailed nature-style pumpkin drawings. For ideas, look at old plant books or modern designs.
Remember, your pumpkin art creativity is limitless. Let your imagination run wild with seasonal drawings.
Common Mistakes to Avoid in Pumpkin Drawing
Artists often struggle to capture a pumpkin’s unique shape. Real pumpkins have subtle curves and contours, not perfect roundness.
Shading can be tricky for beginners. Uniform shading flattens the pumpkin’s appearance.
Understanding light and shadow is key. Observe how light hits the pumpkin’s surface, creating highlights and shadows.
Proportion and perspective can be challenging. Sketch lightly and use basic shapes as guides.
Take time to map out the structure. Don’t rush into adding intricate details.
Colour selection is crucial for pumpkin drawing. Avoid using only oranges for your pumpkin.
Mix yellow, brown, and green to create a palette that captures the pumpkin’s natural depth and texture.
Don’t forget about texture in your drawing. Pumpkins have distinctive ribbed surfaces that need attention.
Use varied pencil strokes for the surface. Gentle crosshatching can bring out the pumpkin’s subtle ridges.
Tips for Final Touches and Presentation
Elevate your pumpkin drawing with thoughtful finishing techniques. Examine your sketch’s details to ensure smooth shading and crisp line work.
Add subtle background elements to complement your pumpkin. Soft earth tones or muted autumn colours can create depth.
Use light watercolour washes or delicate coloured pencil techniques. These can enhance the drawing’s overall composition.
Display techniques are crucial for presenting your artwork. Choose high-quality mounting materials to protect and highlight your drawing.
Acid-free matting and professional framing can improve visual impact. Place your artwork in spaces with natural indirect light.
Digital documentation is excellent for showcasing your pumpkin illustration. Photograph your drawing with a high-resolution camera against a neutral background.
Share these digital images online or submit them to art competitions. You can also use them to build a professional portfolio.
FAQ
What basic supplies do I need to start drawing pumpkins?
To start, you’ll need drawing paper, pencils, and an eraser. Coloured pencils or markers are optional for adding depth and colour.
A sketchbook and pumpkin reference images can help you practice better.
How do I draw a realistic pumpkin shape?
Begin with a basic oval, then flatten the top and bottom slightly. Add subtle curves to create the pumpkin’s unique shape.
Real pumpkins aren’t perfect, so embrace minor flaws in your drawing.
What’s the best way to create texture in a pumpkin drawing?
Use light, curved pencil strokes to show natural ridges and bumps. Vary your pressure to create depth in your drawing.
Use shading techniques like crosshatching or stippling to add dimension. Pay attention to how light hits the pumpkin’s surface.
I’m a complete beginner. How can I improve my pumpkin drawing skills?
Practice basic shapes and observation using reference photos. Start with simple sketches; don’t get upset if they’re imperfect.
Try different techniques and break the pumpkin into basic shapes. Remember, every artist started as a beginner!
How do I add shadows and highlights to my pumpkin drawing?
Look at how light falls on a real pumpkin. Use soft strokes for shadows and light strokes for highlights.
Make areas away from light darker and those hit by light lighter. Notice how light interacts with the pumpkin’s curves.
Can I draw pumpkins in different styles?
Yes! Pumpkins can be drawn realistically, cartoon-like, or in autumn scenes. Try various techniques and styles in your pumpkin drawings.
Don’t be afraid to add your creative twist to your art.
What are some common mistakes to avoid when drawing pumpkins?
Avoid making pumpkins too symmetrical or using straight lines. Remember proper shading, and don’t rush the drawing process.
Pay attention to natural curves and ridges. Remember, each pumpkin is unique.
you may also read : How to Cut a Pomegranate | Easy Step-by-Step Guide